Create and Manage Inbox Signatures
Signatures in Help Scout work just a bit differently than you're most likely used to seeing in traditional email clients. A signature belongs to an Inbox in Help Scout, rather than a User — all emails from that inbox will have the same signature no matter which User is replying. Use variables to auto-populate the signature with individual User information.
The signature editor is a part of Inbox settings that only Account Owners and Administrators have access to.
In this article
Create a Signature
- 1
-
Head to Manage > Inbox(es) > Choose Your Inbox. Scroll down on the main settings page and you will find a section labeled Signature. You'll find a default signature there with the User full name and Inbox email address variables.

- 2
-
Clear out the default variables and start from scratch, or build on that and add your own — that's all up to you!

- 3
-
Use the formatting buttons at the top to do some basic formatting, or click into the HTML editor using the </> button to add your own HTML and make it really fancy if you want!
- 4
-
Toggle Use Signature with Aliases to use this signature when replying from an alias, if you have one set up. This is an optional step.
- 5
-
Click the Save button to save your changes when you're done!


Add Images to Your Signature
First things first, to use images (including social media icons) you'll need to upload those images to a hosting location where you can get an address (URL) for that image that you can call directly. If you're not quite sure how to do that, you'll want to reach out to your IT team or website designer for help getting those images hosted somewhere.
The only exception to that is your Help Scout User profile pictures, or avatars, which you can include using variables. See below for more on that!
Once you have the URL(s) for the image(s) you want to use, you'll just need to use a little bit of HTML to call up that image. If you've never worked with HTML before, don't worry, we'll walk you through it!
- 1
-
Click the HTML </> button to switch over to the HTML editor.
- 2
-
Add an HTML
imgtag to call the image. For example, if the URL for your logo was https://yourimagespace.com/images/logo.png, below is the HTML tag you would add.<img src="https://yourimagespace.com/images/logo.png" alt="Logo">
- 3
-
Click the HTML </> button again to go back to the viewer. If you’re happy with your image, click Save.


Best practice is to keep your images small in both file size and dimension. Remember also that many email clients do not display signature images by default, so there's no guarantee your recipients will see them. They’re often blocked by email security settings or added as attachments, and too many images and links in signatures can cause spam protection services to block your email.
It's a good idea to stick with a lighter touch with signatures most of the time.
Social Media Icons
Adding social media icons works just the same as any other image — you'll still need to have a copy of the image hosted somewhere, and you'll grab that URL and add it with the same steps. You can add a bit more HTML to link those icons to your organization's social media pages.
Need social media icons? Hootsuite has a wonderful guide covering the rules of legal use of social media icons, along with links to the image resources here: Free Social Media Icons (The Ones You’re Actually Allowed to Use).
Here's an example of what that code might look like, where you'll change the URLs to your social media page and the icon you've uploaded to your space.
<a href="https://facebook.com/julesandgeorge"><img src="https://yourimagespace.com/images/facebookicon.png" alt="Logo"></a>
Keep in mind that the signature belongs to the inbox, so you want those links to point to your company pages rather a Users' personal page.
Use Variables to Personalize Your Signature
Variables allow you to personalize the signature even though it belongs to the Inbox instead of a person. Add a variable in to your signature template and the variable will automatically populate the signature with data like the User's name, the inbox email address, and job title when you send a reply. The variables pull this information from your Help Scout User profiles. (See Manage Your User Profile for more on that.)
This allows you to have a personalized signature for each User in your inbox automatically. You can also use variables within the HTML editor.
For example, if the variables {%user.fullName%} and {%mailbox.email%} are in the inbox signature like this:

When User Angela Agard sends an email from the inbox for J&G Clothing's wholesale, the signature will show like this in the email:

You can use variables to populate your Help Scout User profile pictures in the signatures as well. Keep in mind when you do this that you won't see a User's photo populate in the visual display for the signature editor, but it will populate when you send a reply.
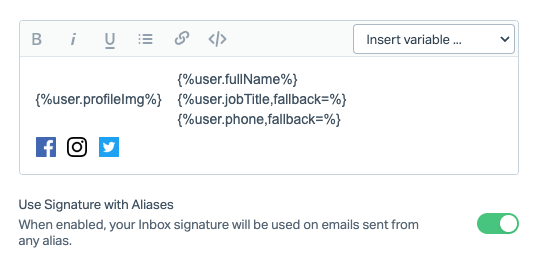
Here's an example where the signature has variables within HTML and using the User's profile photo. Feel free to copy and paste the HTML here and make it your own!
The HTML for this is:
<table>
<tbody>
<tr>
	<td>
{%user.profileImg%}
	</td>
	<td>
{%user.fullName%}
	<br>
{%user.jobTitle,fallback=%}
	<br>
{%user.phone,fallback=%}
	</td>
</tr>
</tbody>
</table>
View this in the visual editor, and you'll see this:

But when you reply to a email, this is how the signature will appear:

For more detail on variables in general, take a peek at Work With Variables.
Common Questions
The information the variables are pulling in is missing, outdated, or showing up incorrectly. Help!
Make sure that all the info on your User profile is up to date and complete. Check out Manage Your User Profile for help with your own profile, or Create and Manage User Accounts if you're working with someone else's profile.
Can I have different signatures for different users?
Nope. Use variables to populate information from User's profiles to tailor the signature to each User.